Fishrapper Fish Recipes Section: How To Fillet and Remove Y-Bones From Northern Pike
 Northern Pike - Caring For and Cleaning Your Catch. Jeff Sundin
Over the years, I’ve devoted a lot of time encouraging folks to become more interested in how we manage Northern Pike in Minnesota.
I’ve hoped to persuade as many of you as I could that the Northern Pike deserves a more prominent spot in our daily fishing and I’ve done my best to convince more of you to utilize this abundant resource.
For those of you who have taken an interest, the next logical step is learning the best way to handle and clean them and how to remove "Y Bones" from pike fillets.
Follow these simple suggestions and I'll bet that you will convert some of the most skeptical Pike critics into pike lovers!
First things first; when it comes to caring for any Pike that you plan to use at home, the most important step in assuring a quality meal is to keep the fish fresh prior to cleaning. As rough and tumble as a pike are, their flesh is delicate and prone to rapid deterioration once they perish.
Many of us have boats that are equipped with wonderful live wells. We do a great job of keeping the fish alive while we’re on the water. This is good because ideally, pike should be kept alive right up until you're ready to clean them. But it’s easy to forget about the plan for keeping pike fresh during the ride back home from the lake.
Using ice to keep fish cold will slow the process of the flesh "breaking down" and preserve freshness. Remembering to bring a cooler with plenty of ice really will make a huge difference in quality and make you a hero at the dinner table. Ice is also a good alternative for times when keeping fish in a livewell is not possible.
By the way, we’re lucky to live in an area where Pike (especially the smaller ones) are plentiful. When you plan to save some for the table, another great approach to preserve freshness is to wait until late in your fishing trip before you start saving fish to take home. It's not too unusal to catch enough pike during the last couple of hours of a trip to allow saving enough for a nice meal.
If you’re only going to be out for a few hours, it won’t really matter when you capture your Pike. But if you’re out on the water for a marathon session and won't head home until the last Mosquito has flown, then it will make a big difference.
Another key factor in preparing gourmet meals using Northern Pike is to avoid saving Pike in the freezer for periods of time. Like many Trout, Whitefish and some salt-water species, pike are oilier and their flesh contains an Amino Acid that breaks down fairly quickly. So even if you’ve taken great care to keep the fish fresh, you could be disappointed by storing them in the freezer too long.
Because Pike are not well suited for long-term storage, the simple rule of thumb at our hosue is to utilize our pike right away, before we start dipping into other food that we may have saved in the freezer.
Serving a delicious meal was the point about saving pike in the first place, so we eat 'em up first. Besides, they’re so abundant and easy to catch that filling the freezer really isn’t necessary. Whenever you're hungry for fresh fish, just load up the kids and go get some more!
Removing "Y" bones from pike fillets seems mysterious and has kept lots of anglers away from using these fish in recipes. The term "Y" bone is a misnomer in the first place because there really isn't any "Y" shaped bone in the fillet. In fact there really isn’t much differenence between the strip of pin bones that you’d remove from a walleye, perch or most other fish caught in Minnesota waters.
What is different is that the "Y Bone" happens to be sandwiched between the two sides of the pike fillet. It's ingrained into the fillet where it is protected from hot oil and this explains why they never "fry out" like the small bones in other fish do.
You have to believe me when I tell you that removing these small bones is really easy! Even the smallest pike can be easily de-boned by anyone who can fillet a Walleye, Crappie or most any other fish; so let's get started.
Begin by filleting the fish just like you would clean a Walleye, Crappie or or most any other freshwater fish. At this stage, the fillet should look pretty familiar to you.
One of the keys to understanding the shape of the bones is to look closely at your fillet. Like a piece of wood, there's a grain imprinted in the fillet and the bones follow this pattern precisely. Once you understand which direction the grain lays out, then you can follow it like a roadmap to remove the bones cotnained within the fillet. So before moving on to step 2, study the fillet for a minute.
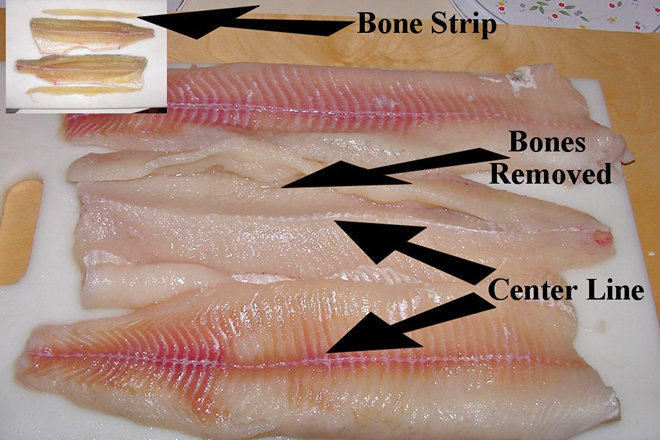
Take a look at the centerline that divides the fillet horizontally. Notice the row of very light bones that's visible halfway between the centerline and the top (fishes back) of the fillet. You will be making one cut just above the top (fishes back) of these bones.
When removing the so called "Y" bones, it's this turn that allows us to follow the bones which are actually shaped more like a checkmark or an inverted "L". Once we're started, removal of this strip of bones requires only a few simple cuts and they all follow this simple roadmap.
Cut 1: Start by making a cut just above this row of bones that you can see (and feel). This first cut will be shallow (about ¼ inch) and it is perpendicular to the fillet. This simple, straight cut is used mostly as an access cut to get your knife into position for the next step. Using the tip of your fillet knife, you’ll be able to feel the edge of your knife contact the bones at the inside corner of this "L" where the bones turn toward the top of the fillet. When you feel the knife contacting those bones, take care not to cut through them.
Cut 2: Turn the edge of your knife toward the top of the fillet at about a 45-degree angle and follow this edge. You’ll be able to see the bones as you gently slip your knife-edge along this edge. Stop the cut before you reach the top edge of the fillet.
Cut 3: This is the finishing touch. Start this cut below the row of bones on the side nearest the centerline and simply follow the same angle that you used to make cut 2. As the edge of your knife moves toward the top of the fillet, you’ll begin to feel this strip of bones peeling away from the rest of the fillet. Trim along these edges as needed to remove the strip and voila, you’re finished.
So there you have it, all you need is a little faith in yourself, a fairly good fillet knife and a little practice. You will soon learn that there is really no trick at all and before long your family and friends will be standing in line at dinner time waiting to sample your newest Pike recipe.
| And ... did you know that Jeff's Thursday Morning Program is available for two weeks after the air date? Yes, you'll never need to miss the show. Click the image and then select the 6:00 hour on Thursday. Scroll in to about 6:20 AM and you're in business! |  |
"The Early Bird Fishing Guide" Jeff Sundin - Fishing Blue Books, LLC 715 Byington Ave, LaPrairie, MN 55744 218-245-9858
Email copyright©2017 Fishing Blue Books, LLC All Rights Reserved - last revised 11-01-17